Unlocking Visibility: Custom Worker Security Report & Profile Tab
- Tawny from Idaho

- Sep 8, 2025
- 4 min read
The Worker Security Report found in the GMS tenant lists all the security groups by type and organizational roles for the workers selected in the prompt. This report allows you to compare the security of as many accounts as you want. You can also add this custom report as a tab on your profile page for visibility.


In the GMS tenant you can utilize the View Security for Securable Item task to verify what security is needed to access the Worker Security report to download the report definition. Additionally, you’ll need security access in your tenant to create a custom report and configure profile groups to display the report as a profile tab.

You can then download the Worker Security Report Definition.

In the event you don’t have access to the GMS tenant let’s go through how to create this as a custom report. Use the ‘Create Custom Report’ task to create a new advanced report, uncheck ‘Optimized for Performance’, and select the data source ‘All Workday Accounts’.

The Workday account, user-based security groups for user, organization roles, and organization role assignments fields are delivered fields and require no setup. The remaining fields are calculated fields we’ll create in the next steps.

The first calculated field ‘Security Groups – Workday-Owned’ contains only workday-delivered fields and this is the setup for this Extract Multi-Instance calc field.

For the four ‘Security Group’ calc fields (Job-Based, Rule-Based, Intersection, Aggregation) we use the same setup for each. The multi-instance calc field requires a second true/false calc field to pull each of those four security group types, one at a time.
Start by making a true/false condition calc field for the ‘Security Group’ business object. The calculation looks for the ‘Type’ field and returns just one selected type. That’s what your field name should match with. Copy the calc field and repeat for all four group types.

Using those four true/false calc fields create your multi-instance calc fields. It pulls from business object Workday Account and Source field ‘Security Groups’. The related business object is ‘Security Group’. And the condition field will be that true/false calc field for each type you created in the previous step.

Next up is the filter tab of the report where we filter by worker as the default prompt. This is important and not optional.

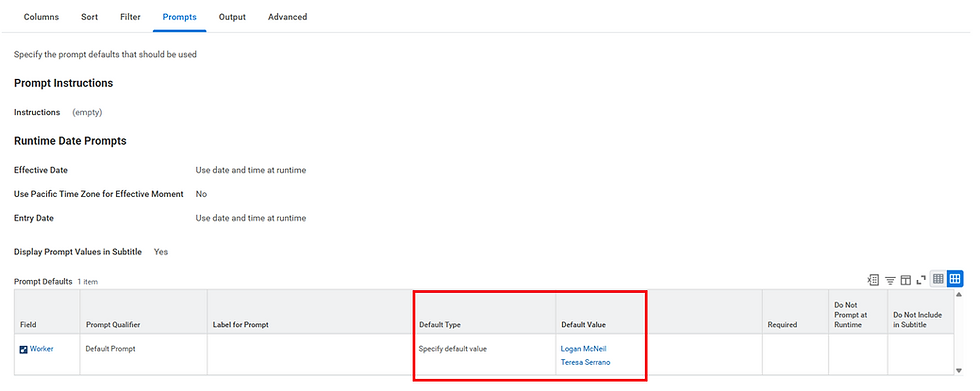
The filter tab contains a default prompt so on the prompt tab make sure you click the checkbox for “populate undefined prompt defaults” if it’s not already populated.
Optionally here, you can specify default values as a prompt. In GMS you can see they have Logan McNeil and Teresa Serrano as the default worker selection.

Don’t forget to share! Sharing is caring!
Also not optional, you must share the report, or no one will be able to see it either as a report or as a profile tab.
We have ours locked down to only security admins and security partners.

Ok, now that we have our report let’s go add it to the profile so we can see it where we’re most likely to be, their profile, rather than having to run a report.
Go to the configure profile group task and search for just the word “job”.

Click the add button at the top, or any add button in the list to control what order the tab will appear in, for those with security access to view it.
In the report box the drop-down list should display “Allowed Custom Reports”. If it doesn’t appear at all, or you can’t see your new Worker Security report in the allowed custom reports list it likely means some part of the report setup doesn’t comply with the requirements.

If you can’t see the option for “allowed custom reports” or you don’t see “Worker Security” in the allowed custom reports list one of these is the likely culprit. Once resolved, the report will be selectable in the Configure Profile Group task.
Report Visibility in Configure Profile Groups
You can’t add advanced and composite reports that use outlining.
Must have a prompt for worker & the prompt must be visible (i.e. not set as Do Not Prompt at Runtime).
Have all other prompts set as Do not Prompt at Runtime.
Be shared.
In Figure 15 you can see that the ‘Job for Worker Profile’ group displays the Worker Security custom report as a tab. Make sure “display in profile” is checked and select ‘done’ to save.

To recap we:
Created the custom report ‘Worker Security’ based on the GMS example.
Created calculated fields to pull each security group type.
Shared the custom report so it’s visible.
Added the report to the job tab of the worker profile.
If a person has the security to view the report, this is what the profile displays, with the Worker Security tab as an option.
One final thing to note, while you can rename the fields in the report, there is no way to rename the tab itself. So, if you have conventions for custom reports, for example, we append our initials on ours, you’ll want to be aware that the report name is the tab name and is exactly how it will appear.

See you remotely or in-person in San Francisco for the pre-Rising weekend Share-a-thon. For the remote sessions, view the links on the event FAQ, here: https://www.customersharingmovement.com/pre-rising-san-francisco-2025/faqs
_edited.png)


Comments